You deserve a business you always dreamed of.
Your path to success begins here.
Creating an online business can be a daunting task, but with the right support and resources, you can transform your vision into a thriving reality. Learn with confidence and clarity.
1. Validate your idea
Confirm your concept is viable before you start building your business.
Before you get started creating your digital business—let's say you want to launch a mini-course—first, you should validate your idea.
Why should you validate your idea?
Sometimes what we assume our audience might be interested in purchasing might not be what they actually will purchase.
Let’s use Shelly as an example. Shelly is a personal trainer looking to start a few online courses for her clients. She regularly teaches her clients about nutrition and weight bearing exercises. Shelly thinks her clients would like a mini-course about at-home weight bearing exercises. However, when she talks to her clients, most express interest in meal prepping and fast, healthy recipes. This should be the topic for Shelly’s first course. Shelly’s glad she asked her clients so she could create the course that is most helpful and relevant for her clients!
How to validate your idea:
We’re going to post a survey on one social media platform and get feedback in real time!
Select a social media platform:
Choose a social media platform that you use the most often and feel most comfortable with. Don’t worry about using a business social media account yet. It will take some time to build up a following of people you don’t know. The best way to validate your idea and get started is to leverage the network you already have on your personal platforms.
Choose one social platform that you have the biggest personal audience such as:
- X (formerly Twitter)
Many social platforms allow you to include a survey (sometimes called a poll) directly on your post.
On your personal account, post a survey to ask your current audience what topic they’d be most likely to purchase from you.
Survey Post Template:
Hi Everyone! As some of you know I’m starting my business on [business topic or theme]. I’m currently working on creating my first mini-course and need your help!
Which one of the following mini-course topics would you be most likely to purchase?
- Topic 1
- Topic 2
- Topic 3
- Topic 4
Leave a comment if you have another topic you’d be interested in.
Frequently Asked Questions
What if I don’t use any social media?
That’s okay! Create a one-question survey using a free service like Google Forms and email it with a note like the one above to your contacts.
How do I choose the right topics for my mini-course survey?
A mini-course is a short description of a specific topic. Typically, a mini-course is one module with no more than 5 lessons in it. A lesson is usually a video that's probably anywhere from 5 to 15 minutes long. For a mini-course, I wouldn't include PDF attachments or quizzes unless you feel they're absolutely necessary.
Think about the customer problem that you’re going to solve with your mini-course. If the solution is five steps or less, that’s a great topic for a mini-course.
What are some examples of topics that are specific enough for a mini-course?
Good example: Shelly and her meal-prepping or at-home weight bearing exercise mini-course topics.
Bad example: Using Shelly again, a bad topic (because they’re too broad) would be “improving your food habits” or “how to get fit”
If you’re unsure about your topics, post them in the “Challenge Updates” circle and we can discuss together!
2. Customize brand settings
Site Branding Settings allow you to customize your logo, favicon, colors, course instructor, and page scripts. By completing your site branding settings first, you will save yourself time when customizing the rest of your Kajabi platform.
Update your Site Branding Settings
To view and update your branding settings:
- Open the Settings tab from your Dashboard.
- Click Site Details:
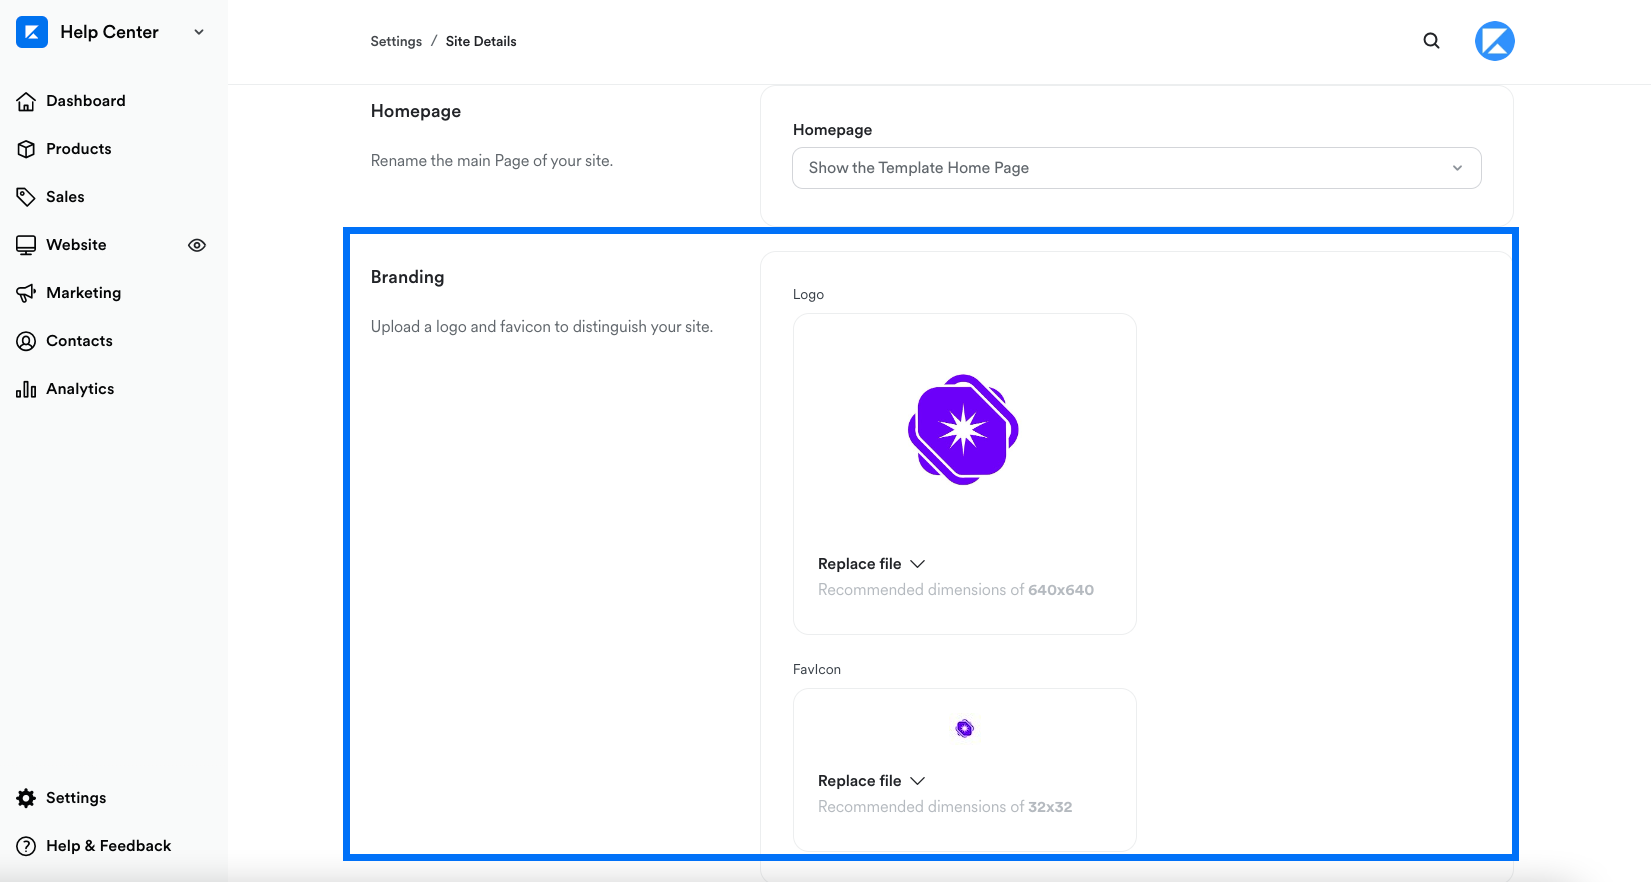
Branding
Set the default Site Logo and Site Favicon used across all new templates on your site. Anytime you create a new Page, Product, or Website the templates associated with each will pull from the Branding section for the default install.
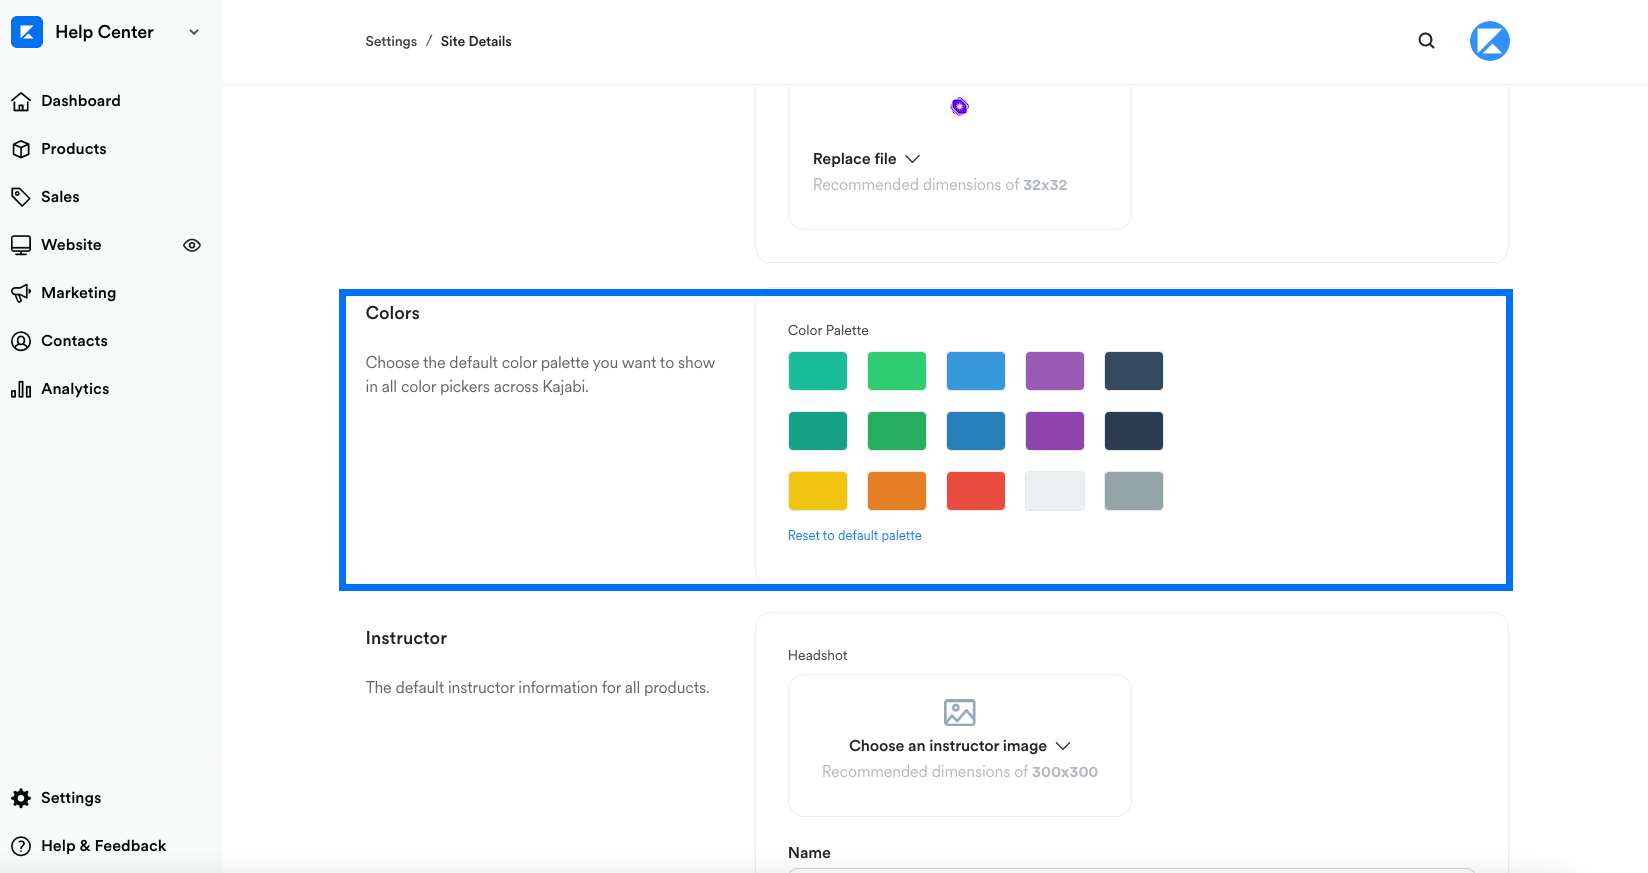
Colors
Set the default color palette used in the color pickers of all editors on your site. Each time you create a new Page, Product, or Website the editor will pull from this default palette to populate your color picker options.
How do I create my custom color?
To create your custom color palette, click the color you wish to change and enter your RGB color code in the bottom right field or use the sliders to select your color.
- Use the vertical bar to select the hue.
- Use the square box to adjust the saturation and brightness of your color.
- Use the horizontal bar to adjust the opacity of your color.
Then, after selecting your custom color, click Save in the top right corner or bottom right corner of the page to keep your changes.
You can manually edit the instructor information for each product and lesson pages by customizing the template. However, with Premier, Creative, and Prosper, you can add an instructor block that links to your instructor bio site settings to quickly and easily update your instructor information from your site settings. Learn to customize your template.
Page Scripts
The text added here will be placed in the <head> section of every page on your site. This includes Products, Lessons, Landing Pages, Website Pages, and Static Pages.
The Header Page Script allows you to add custom javascript on your site pages. For example, you can add a Cookie Disclaimer onto your site pages with the Header Page Script. Learn more
Page scripts will not display on your Checkout Pages. Learn to add custom tracking code to your checkout pages.
Warning: Introducing custom code to your site can open you up to vulnerabilities and potential malware attacks. We recommend using vulnerability tools like VirusTotal or Snyk to scan any custom code that you intend to use and apply certain best practices to help reduce potential impact.
To add to your Page Scripts:
- Open the Settings tab from the Dashboard.
- Click Site Details.
- Scroll down to Page Scripts.
- In the Header Page Scripts text box, enter your custom script.
- Click Save to keep and apply your changes:

Additional resources:
3. Add your instructor details
Add your instructor name, a brief biography, and upload a photo to personalize your site.
Where to add instructor information
Your Course and Lesson pages are a great place to add some instructor bio information.
Share relevant details about yourself with your Course customers, such as your name, photo, and details about your professional background, qualifications, subject matter expertise, or interests.
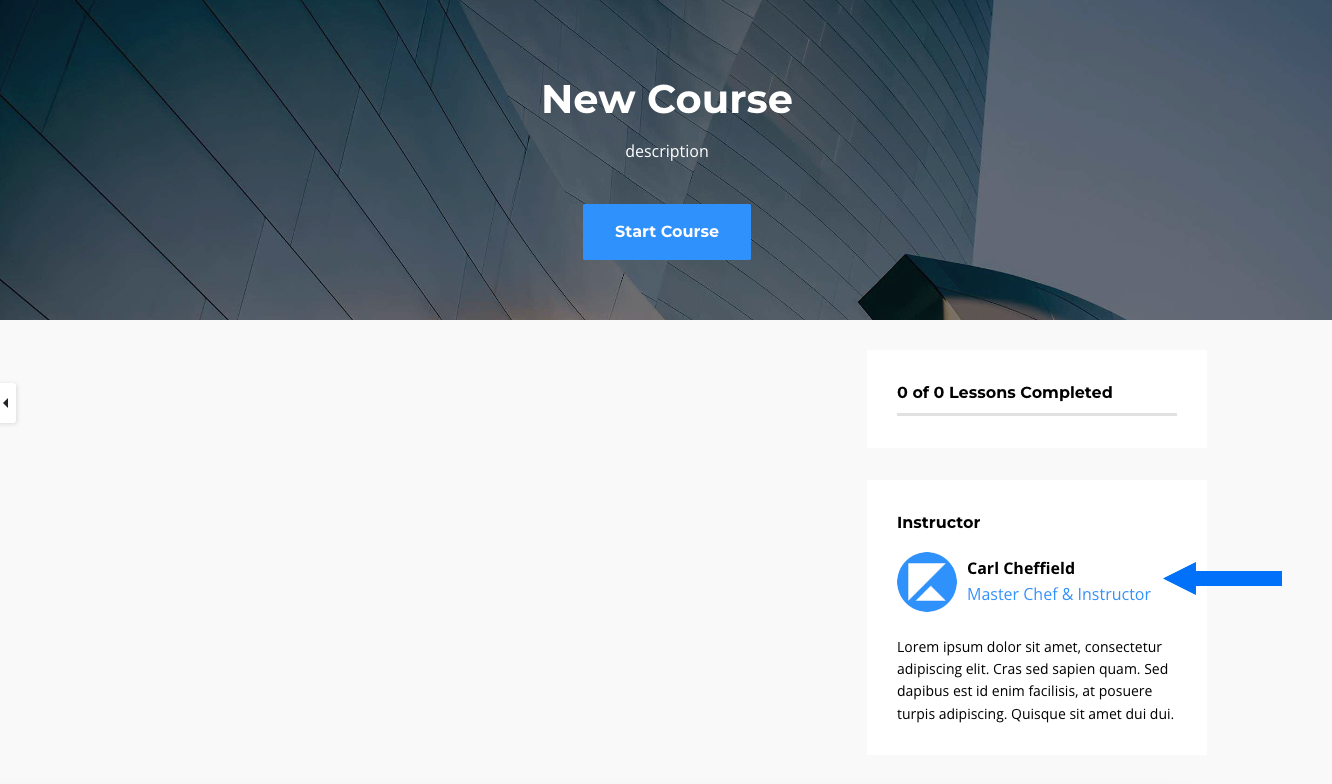
Course templates with a built-in Instructor Block
The Premier, Creative, and Prosper templates all include a conveniently built-in Instructor Block that you can add to your Course and Lesson sidebars.
First, add your instructor image, name, title, and instructor bio in your Site Details Settings , and those details can be linked to the Instructor Block on both your Course and Lesson page templates when you customize your Course.
Adding instructor info to other templates and pages
Want to add your instructor information to a Course template or site page without a built-in Instructor Block? No problem! Add your info to any page you’d like using sections and blocks in the Page Builder.
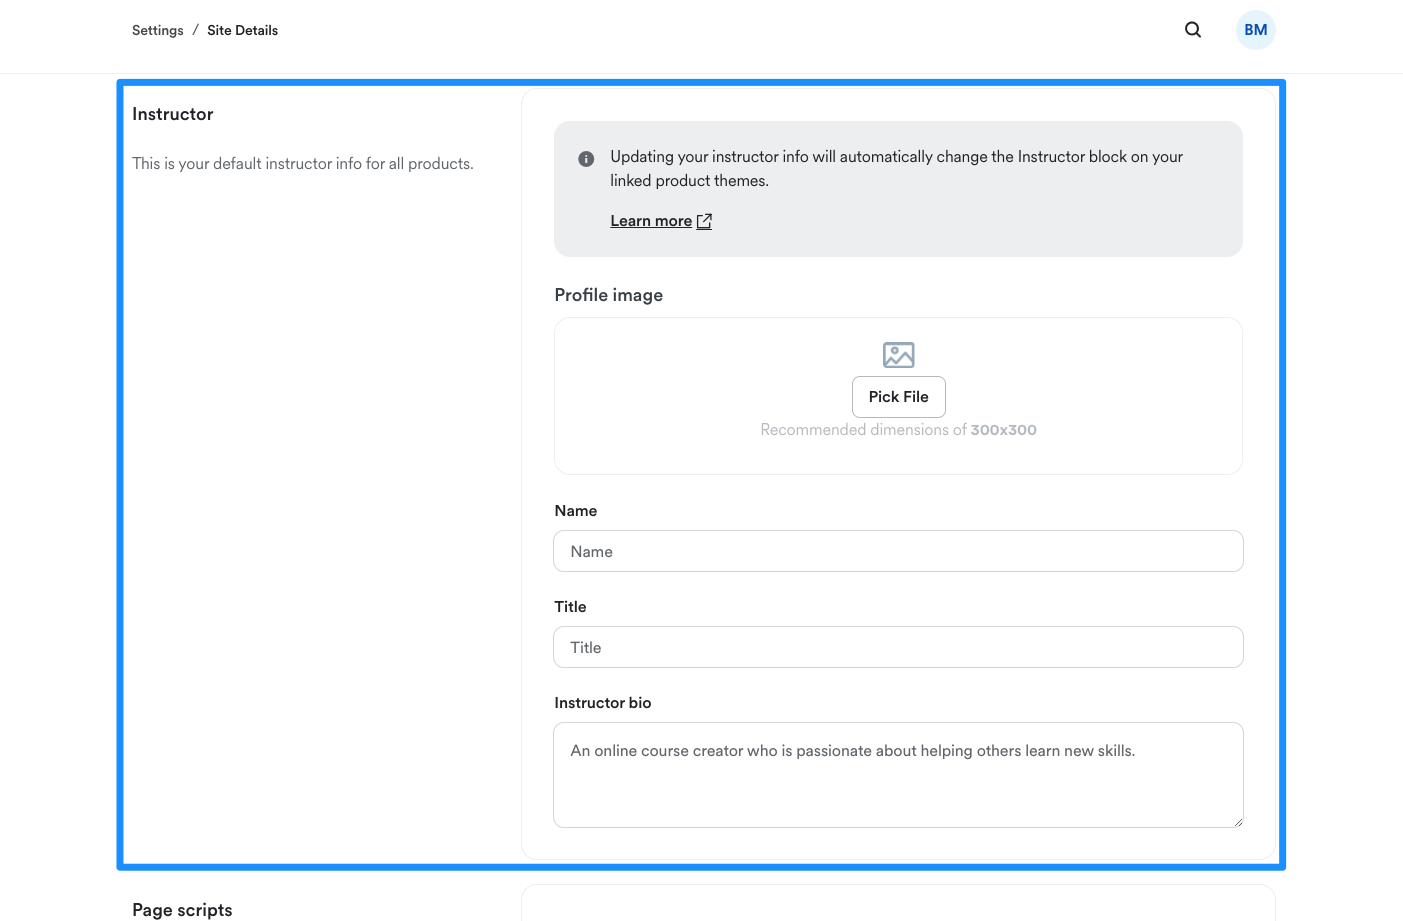
Update your instructor info in the Site Details Settings
Add your instructor image, name, title, and instructor bio in your Site Details Settings. Then, create a Course using the Premier, Creative, or Prosper template and add an Instructor Block to your Product Sidebar.
By linking your course instructor block to instructor bio site settings, your information will be pulled into your course:
To edit your instructor information in your Site Settings:
- Open the Settings tab from your Dashboard.
- Click Site Details.
- Navigate to the Instructor section.
- Upload an image of the instructor.
- Enter the instructor's name.
- Include the instructor's title.
- Add the instructor's bio.
- Then, click Save to keep and apply your changes:
Add instructor info to your Course page template
The Premier, Creative, and Prosper templates include an Instructor Block that you can add to your course sidebar, which you can customize with your own information.
If you choose to build your Course with a template that doesn’t have a pre-built Instructor Block, you can create one using the default text and image blocks in the Page Builder.
Add instructor information by customizing the built-in Instructor Block
To manually edit the Instructor Block on your Course page template:
- Open the Products tab from your Dashboard.
- Select a Course to edit.
- Click Customize.
- Place your cursor over the Course page template and click Customize.
- Then, click to open the Instructor Block in the Course template sidebar.
- Deselect "link to instructor bio site settings" if you wish to manually update your instructor block.
- Update the Heading, Image, Name, Title, and Bio fields as desired.
- Click Save to keep your changes:

Additional resources:
4. Build a waitlist
Creating a waitlist is an excellent method for allowing those who are interested in your Products to opt-in and potentially purchase your Offer when it becomes available.
Step 1. Create your waitlist form
To begin, you'll need to create a Form on Kajabi to collect contact information from prospective customers who wish to join your Offer waitlist.
- Open the Marketing tab from the Dashboard.
- Then, select Forms.
- Navigate to the top right corner of the page and click + New Form.
- Enter the Title for your Form.
- Click Save.
- Customize your Form as desired (Learn more).
Step 2. Build your waitlist landing page
After creating your Form, build and customize the Landing Page that will contain your Form and communicate to your page visitors that the Offer has already reached capacity.
Learn to add a Form to your page.

Additional resources:
- How to Import Contacts Onto Kajabi
- How to Create a Waitlist for Your Offer
- Membership Marketing Formula: Learn the 3 Steps to Building a Profitable Membership Site. Free course at Kajabi University.
5. Connect Kajabi Payments
Kajabi Payments
Kajabi Payments is an all-in-one solution that gives you everything you need to accept customer payments, oversee purchases, manage refunds, initiate payouts, and more — all from your Kajabi dashboard!
Kajabi Payments is purpose-built for Kajabi Heroes to support an all-in-one experience. It includes exclusive features like additional payment methods such as Apple Pay, Google Pay, Afterpay and more:
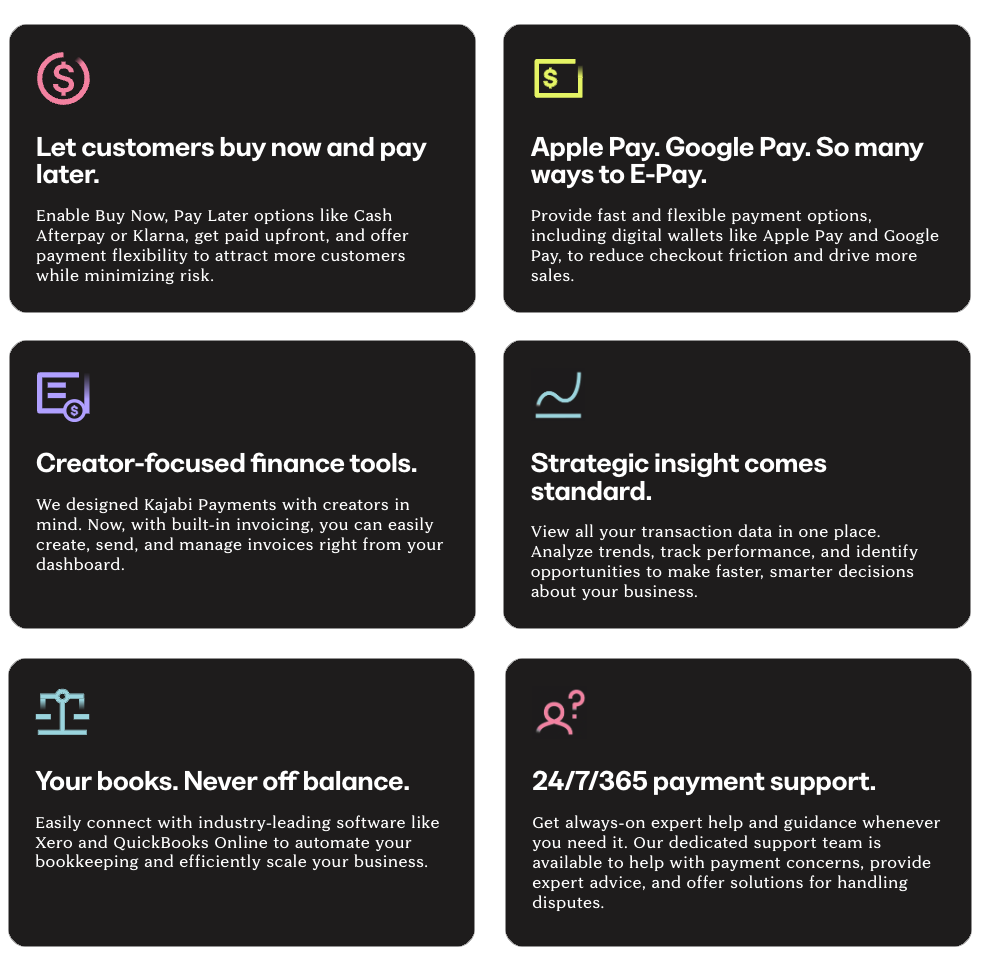
With Kajabi Payments, your Checkout page enables customers to purchase your Offers effortlessly. They can either enter their credit card information directly on the page or choose from the additional payment methods you've selected. The payments are then processed and collected into your connected bank account, incurring a small fee that’s equivalent to major payment providers. Learn more.
Kajabi Payments is currently available to Kajabi customers whose businesses are based in the United States, Canada, Australia, the United Kingdom, and select European countries.
Learn more about payment integrations.
6. Create a product
Create a minimum viable product (MVP) with enough features to attract early-adopter customers to validate a product idea.
There are 5 different product types in Kajabi.
Course
Deliver your knowledge digitally to your customers
Offering online courses allows you to share your expertise with a global audience, delivering valuable content digitally while scaling your business without limits. With an online course, you can monetize your knowledge, creating a scalable income stream while positioning yourself as an authority in your field.
Community
Create a space for your community to connect via discussion circles, challenges, meetups, direct messaging, and live events.
Building a community fosters deeper relationships with your audience, encouraging long-term engagement and loyalty, which can lead to higher customer retention and organic growth.
Newsletter
Deliver valuable content to your audience right in their inbox or through your website
A newsletter serves as a direct communication channel, allowing you to consistently nurture your audience, promote your offerings, and keep them updated with valuable content that drives ongoing interest. With Kajabi, you even have the option of offering a free or paid Newsletter, enabling you to monetize your content.
Podcast
Share information with the world, letting your audience in on conversations they wouldn’t normally have access to in their everyday life.
Launching a podcast gives you a unique platform to reach a wider audience, share your message in a more personal way, and expand your influence by featuring guests and addressing industry-relevant topics.
Coaching
Meet with your coaching clients in an engaging, one-on-one or group, interactive setting.
A Coaching Program allows you to reach your customers in an engaging, interactive setting.
7. Price your product
Create and price your offer.
Learn to build Offers on Kajabi to package and sell your Product(s) to your customers. Unsure of how to price your products? This webinar will guide you through the strategic processes to price in a way that maintains your security in the marketplace.
Additional resources:
8. Design your website
Building your website with Kajabi gives you the flexibility and the direction to create beautifully designed, user-friendly pages to make up your site. Learn to use the different features Kajabi provides to help you create and design your pages.
Designing your website
Your website can be designed with Kajabi's highly-customizable page templates and streamlined templates built to help you get started.
With Kajabi, you can build and design your system website pages, custom website pages, and unique landing pages to use on your website, in your emails, and in your Products.
What is the Design tab?
You may notice that when you open the Website tab, you are immediately directed to Design. The Design tab is your control center for the overall look and feel of your website.
In Website Design you can:
- Preview your site.
- Manage your templates.
The purpose of the Design page is to select and preview your overall website template. Customize your overall website look and feel according to your brand by first selecting your Website Template from the Template Store. Customize your overall website look and feel according to your brand by first selecting your Website Template.
Then, customize each page of your website and design unique marketing pages with the flexibility of the standalone page.
Your pages can be used to
- Encourage Opt-ins to grow your list,
- Display Video Players,
- Create Sales Pages for your digital products,
- Custom create an Online Store for physical products
and more!
With Kajabi pages, build and design custom landing pages to help you accomplish your vision for your business.
What are website pages, landing pages, and funnel pages?
What is the difference between all the pages on Kajabi?
Website Pages are the foundational, standard website pages Kajabi has generated for you to make up the foundation of your website.
Standalone Landing Pages are individual, standalone pages available for your unique website use. Build marketing pages, individual waiting list pages, promotional sales pages, and more with the flexibility of the Landing Page. Link them to your website through navigation menus or keep them separate and use various mediums such as your marketing emails or social media accounts to drive traffic to your standalone pages.
Funnel Pages are landing pages built into your Marketing Funnel flows.
Additional resources:
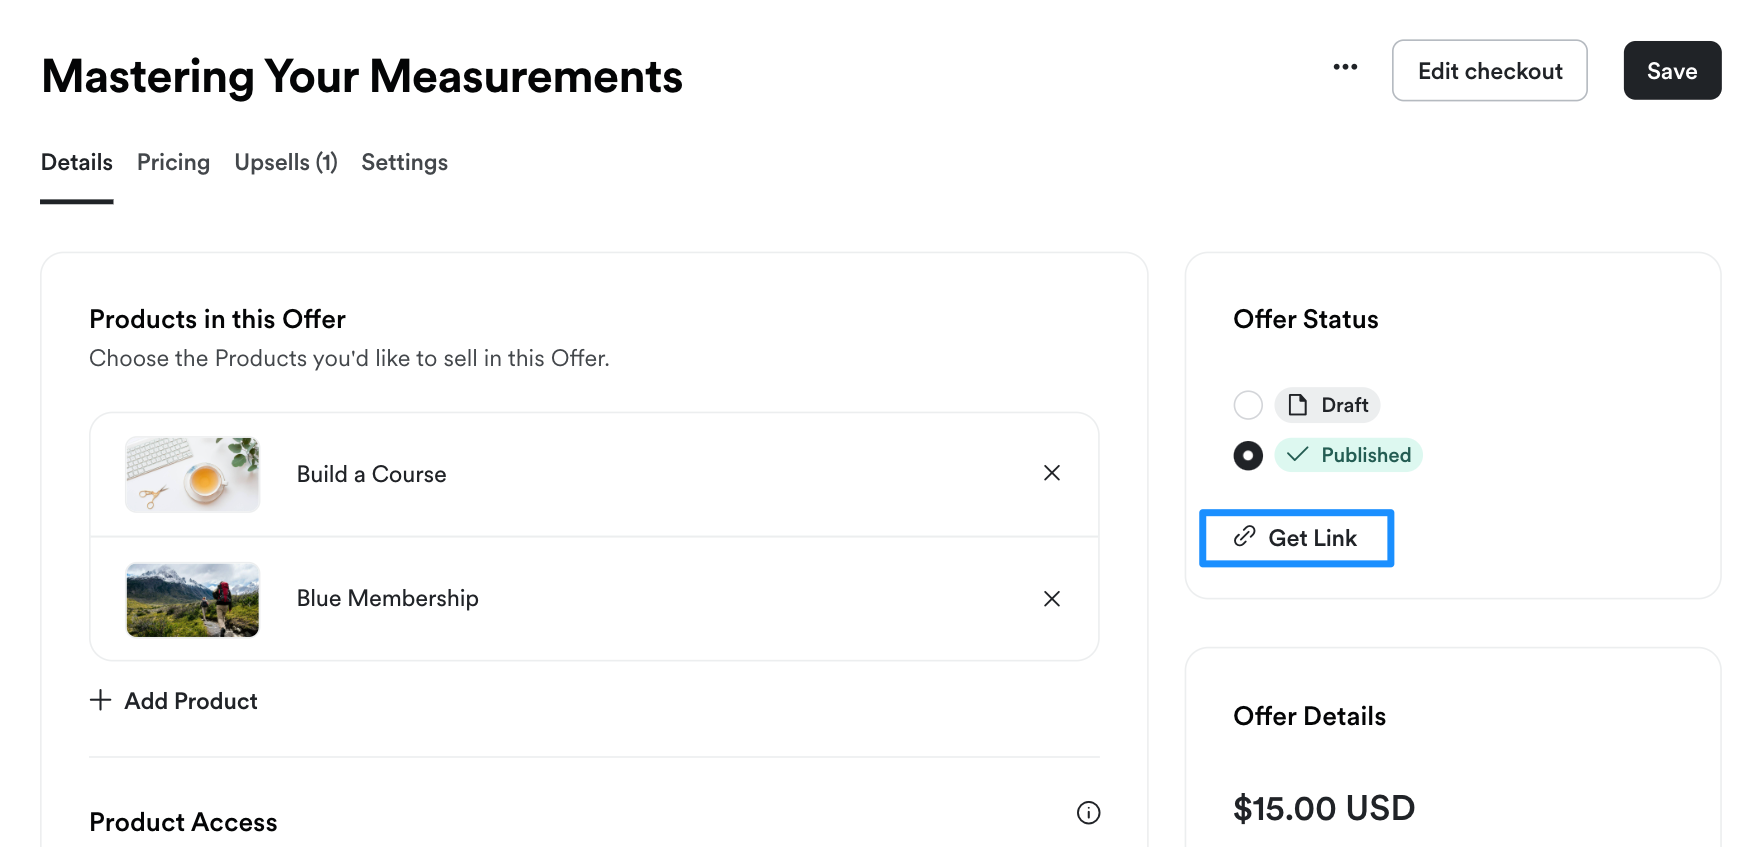
9. Test the journey
Before posting your Offers to the public, you may want to consider testing a purchase from your Kajabi site to be certain everything is working as it should. Follow our guide to learn how to create a test purchase in Kajabi!
First, clear your cache and cookies from your browser and log out of your Kajabi account, or open a private/incognito window or use a different browser.
To test your purchase in incognito mode:
- Open the Sales tab from your Dashboard.
- Then, click Offers and select the Offer you want to test.
- In the Offer Status card, click Get Link.
- Open an incognito window and paste your link.
- On the checkout page, follow the flow of your customers by going through the process of purchasing your Offer:
After you submit your payment (or sign up for free, if testing a free Offer), you'll receive an email at the email address you entered on the checkout page. The email will contain a login link to access the product(s).
Best practices when testing a purchase
Only use the Offer Link (not the Preview link) when testing:
Always use a different browser or incognito/private window when testing.
To successfully test a purchase, do not test on the same browser when logged in as an Admin of your Kajabi account.
Why can't I test my checkout?
Is your purchase button un-clickable? Be sure to exit out of preview mode when testing your Checkout Page:
Testing a purchase in Preview mode will not allow you to purchase.
Simply open a new window and enter the checkout page URL excluding the preview=true piece of the URL.
Use a different email address when testing.
We recommend creating a separate email address specifically for testing purposes. This will allow you to use different variations of the same email address for tests you wish to perform on your site.
- If you are using G-Suite or any new test Gmail address, simply insert a "+" character before the "@" symbol and insert any verbiage you wish. This will send any applicable emails connected with your test to your Gmail inbox with a unique identifier.
- Example: kajabihelpcenter+purchasetest1-date@gmail.com
Testing as an Existing Customer
For an existing customer, be sure that you are not logged in as the existing user to simulate the same transaction process. Remember to always test in a different browser or incognito/private window when testing to ensure an accurate simulation of a purchase.
Check out this article for details on how existing customers can purchase additional Offers from your site.
And that's how to test your purchase process in Kajabi! Please vote below and let us know if you found this article helpful. We value your feedback. Thanks for being the best part of Kajabi!
10. Finalize your website
Learn how to create a beautifully profitable sales page.
Discover the secrets behind creating beautifully profitable Kajabi sales pages that combine high-level design with proven sales strategies.
11. Launch your MVP product
Drive traffic to your sales page for purchase
- Publish mini-course/webinar
- Publish offer/checkout page
12. Manage your launch
Learn how to manage your Contacts & use Analytics.
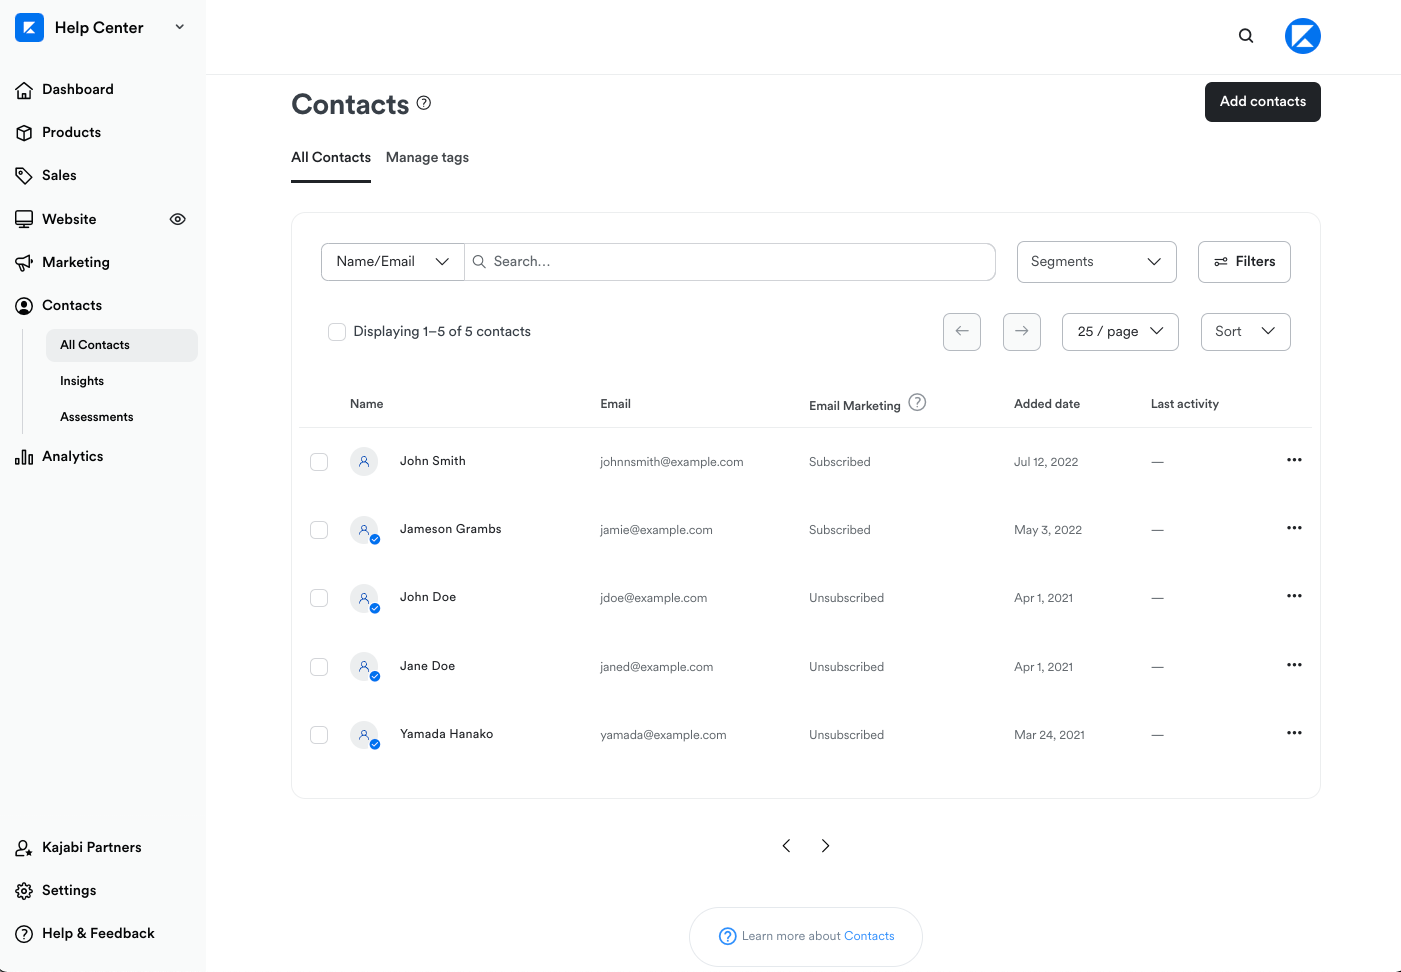
The Contacts tab is your organizational tool to help you manage the information for your contacts. In other words, the Contacts tab is your built-in Customer Relationship Management System (CRM) on Kajabi.
With Kajabi, all of your contacts are added to a single list to easily view, access, and manage their accounts. Within the Contacts tab you can manage existing contacts with Segments and Filters and add new contacts to your site.
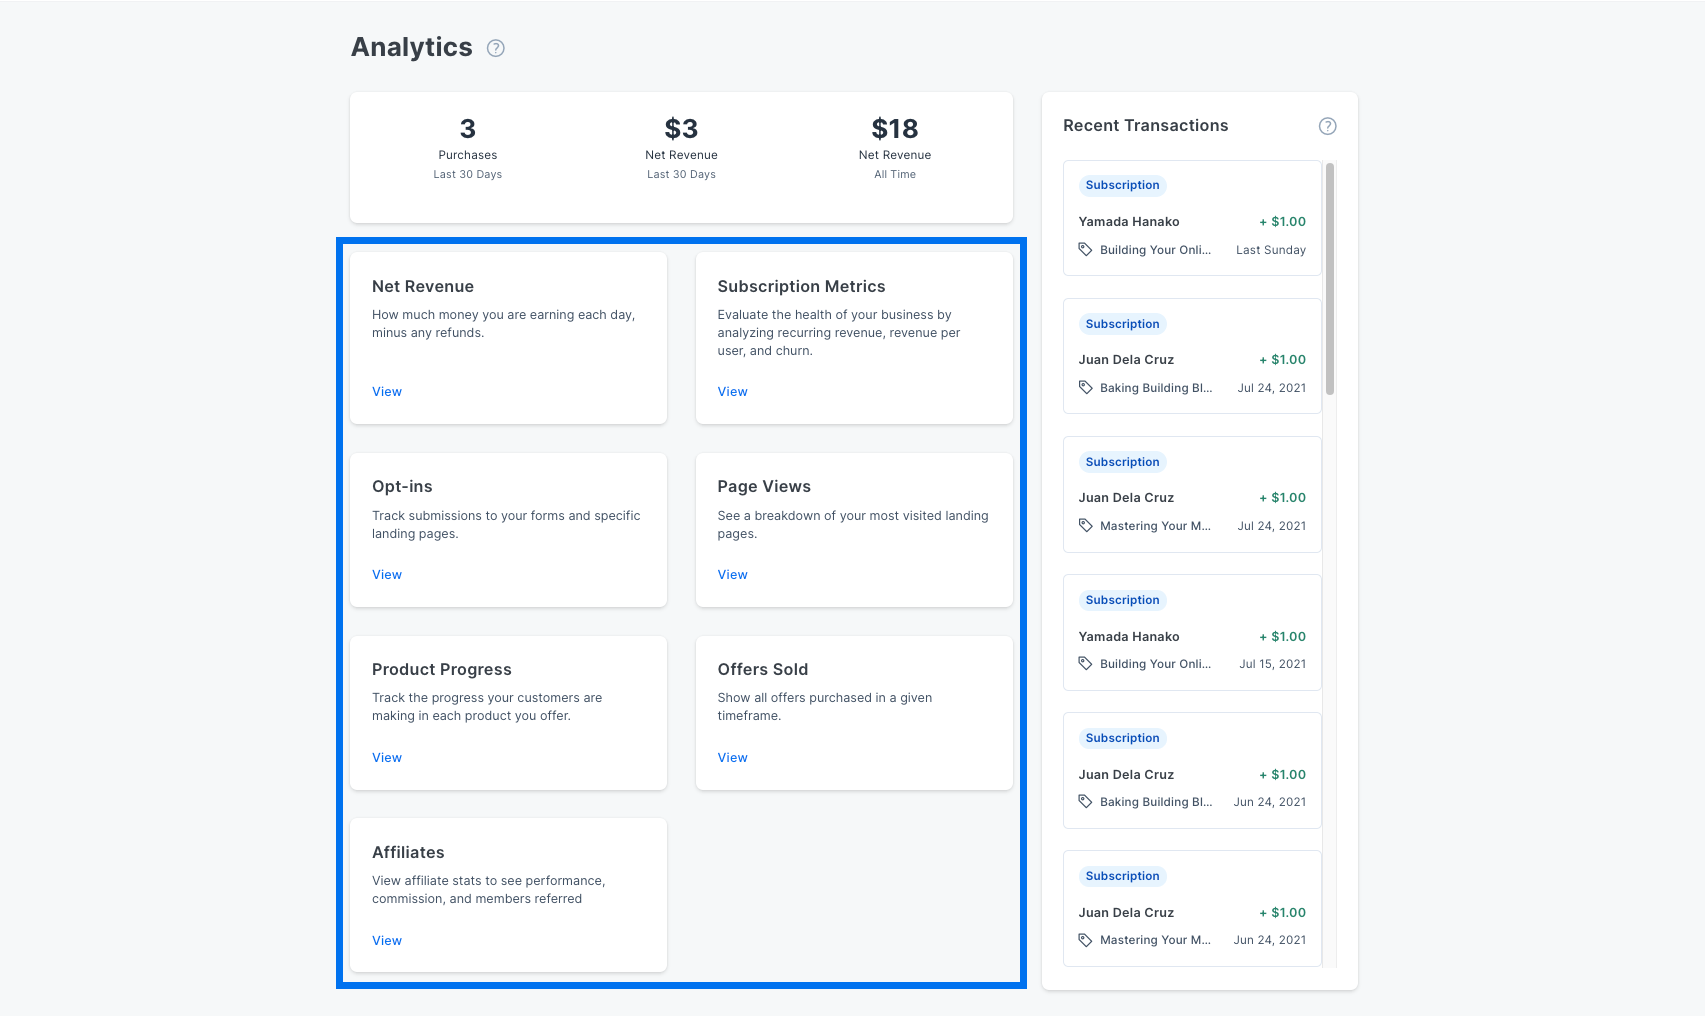
The Analytics dashboard contains the analytics tracked on your site, including Net Revenue, Subscription Metrics, Opt-ins, Page Views, Offers Sold, and more! Knowing your analytics and conversion rates can help you better understand your customers and prospective customers and evaluate the health of your business.
How to access your Analytics dashboard
- Open the Analytics tab from your main Kajabi dashboard.
- View recent transactions and overview analytics, or click View on the tile for the specific analytic you'd like to review:
Analytics reports
The following reports are available in your Analytics dashboard:
- Net Revenue - How much money you are earning each day minus any refunds or discounts.
- Subscription Metrics - Evaluate the health of your business by analyzing recurring revenue, revenue per user, and churn.
- Opt-ins - Track submissions to your forms and specific landing pages.
- Page Views - Identify your most visited landing pages and website pages.
- Product Progress - Track the progress your customers are making in each Product.
- Offers Sold - View all Offers purchased on your site in a given timeframe.
- Affiliates - View Affiliate commissions and Offer purchases attributed to your Affiliates:
Discover all the ways you can access analytics including Net Revenue, Subscription Metrics, Opt-ins, Page Views, Offers Sold, and more within Kajabi. Take the Introduction to Course Analytics course.
Additional resources:
13. Gather feedback and iterate for full product launch
User surveys, direct customer interviews, and feedback forms to gather insight from your MVP to make your full product.
With Kajabi, you can build various website widgets including a Reviews Trust Bar and Social Proof widget to display ratings and reviews from multiple platforms directly onto your page with Kajabi Pages. Learn more.
Additionally, you can showcase ratings and reviews by embedding a third-party application review widget in a page.
With the many third-party applications that allow you to display your reviews and ratings directly from your website, we recommend finding the tool that best fits your business.
For the purpose of this guide, we will be embedding the review widget from EmbedSocial.
With EmbedSocial, capture reviews and ratings in real-time from social media, web forms, email, and more with their Zapier integration.
Learn more about embedding reviews with EmbedSocial.
14. Nurture your contacts
Use email sequence to entice contacts who opted into your waitlist but haven’t purchased your MVP product yet.
In email marketing, the best results are generated when you send emails exclusively to an audience that interacts with your content. So, this brings up the question: "How do I guarantee that my current contact list wants my emails?"
Growing an organic contacts list
There is no question; you will attain the best email marketing results by sending emails to contacts who want to receive them. In other words, don't purchase email lists.
Purchased lists are typically full of invalid and other lousy email addresses. If someone does not opt-in directly to you, then they are not opted-in to receive email from you. The use of purchased email lists is prohibited by Kajabi's Anti-Spam Policy. Be sure to grow your contact list naturally through Double-Opt-In forms on pages that fit your target audience.
Offer a double opt-in subscription:
The Number One rule of growing an Organic Contact List is using a Double-Opt-In form. Acquiring contacts through your own opt-in is vital to holding a good sender reputation.
A double Opt-In means the sender is validating the email entered on its website twice, first by having the user enter the address on the site and then asking recipients to confirm their subscription through a confirmation email.
To offer a double Opt-In subscription:
- Open the Marketing tab from your Dashboard.
- Then, select Forms.
- Open your desired Form or create a new one.
- Then, select Double Opt-In (Recommended) to enable your Double Opt-In.
- Select any Additional Options you wish to apply and customize.
- Click Save to keep and apply your changes:
It is also in good practice to:
Offer an Opt-Out: Due to U.S. and International Anti-Spam Laws, Kajabi has added an Opt-Out to your Email Sequences, so we've already got you covered.
Verify Recipient Engagement: ESPs measure your reputation through the engagement of your recipients. If recipients are opening, forwarding, and replying to your emails, it will improve your status.
To find your recipient Engagement: - Open the Marketing tab from your Dashboard and select Email Campaigns. - Select the desired Email Campaign and then click Report.
Maintaining your mailing list's health
Unsubscribe inactive contacts
To improve your Sender Reputation, we recommend unsubscribing contacts who aren't responding or interacting with their emails after 180 days. ISPs measure engagement, such as opens or clicks, as a positive sign, which improves the sender's reputation.
Kajabi defines "Inactive" as a non-customer, subscribed, at least 30 days old, has been delivered an email in the past 90 days, but has not opened an email in the past 90 days, and has not clicked a link within an email.
To manage your inactive contacts:
- Open the Contacts tab from your Dashboard.
- Filter your list:
- Category: Email Engagement
- Conditional: Inactive Contacts
- Value: Include email opens
- Click the Select all checkbox or manually select the inactive contacts of your choosing.
- Open the Bulk Actions dropdown menu.
- Select Unsubscribe.
- Complete the prompt and confirm your intention to unsubscribe:
Additional resources:
- Best Practices for Growing and Maintaining Your Contact Lists
- Demystifying Email Deliverability
- How Auto Unsubscribe Helps You Maintain a Healthy Mailing List
- Join John Grimshaw as he teaches how to turn new prospects into lifelong customers with this free Email Marketing course.